


Electric Bike Performance Guide: Maximize Speed and Range
Most riders buy an electric bike expecting a rush and end up confused when the performance feels flat. This electric bike performance guide cuts through that frustration by focusing on what actually moves the needle: maintenance, tuning, riding technique, and smart upgrades. Whether your bike feels sluggish on climbs, drains its battery too fast, or just lacks the punch you expected, the fixes are almost always simpler than you think. You do not need a new motor. You need a system.
Table of Contents
- Key takeaways
- Your electric bike performance guide starts here
- Quick wins: maintenance checks that actually move the needle
- Battery, assist settings, and riding technique for more range
- Hardware upgrades and advanced tuning: what to know first
- Measuring and verifying performance improvements
- My honest take on e-bike performance tuning
- Upgrade your stopping power before you upgrade your speed
- FAQ
Key takeaways
| Point | Details |
|---|---|
| Maintenance before upgrades | Fixing tire pressure, brake drag, and chain lube delivers speed gains before spending money. |
| Know your class limits | US e-bike classes cap motor assistance at 20 to 28 mph, which shapes every tuning decision. |
| Cadence drives efficiency | Pedaling at 70 to 90 RPM reduces motor strain and can unlock 10 to 40% more range. |
| Measure, then tune | Track your Wh/mi consumption on real routes before adjusting assist settings or buying parts. |
| Brakes before power | Upgrading stopping power should always come before increasing motor output for safety reasons. |
Your electric bike performance guide starts here
Before touching a single setting, you need to understand what your bike is legally and physically capable of. US e-bike classes cap motor assistance at 20 mph for Class 1 and Class 2 bikes, and 28 mph for Class 3, with a federal ceiling of 750 W. That framework is not a limitation to work around. It is the boundary inside which all real performance optimization happens.
Here is how the three classes break down in practice:
- Class 1: Pedal assist only, no throttle, motor cuts off at 20 mph. Best for trails and multi-use paths.
- Class 2: Throttle assist available, motor cuts off at 20 mph. Useful for urban commuting with less pedaling effort.
- Class 3: Pedal assist up to 28 mph, sometimes throttle to 20 mph. Fastest legal class, often restricted from shared paths.
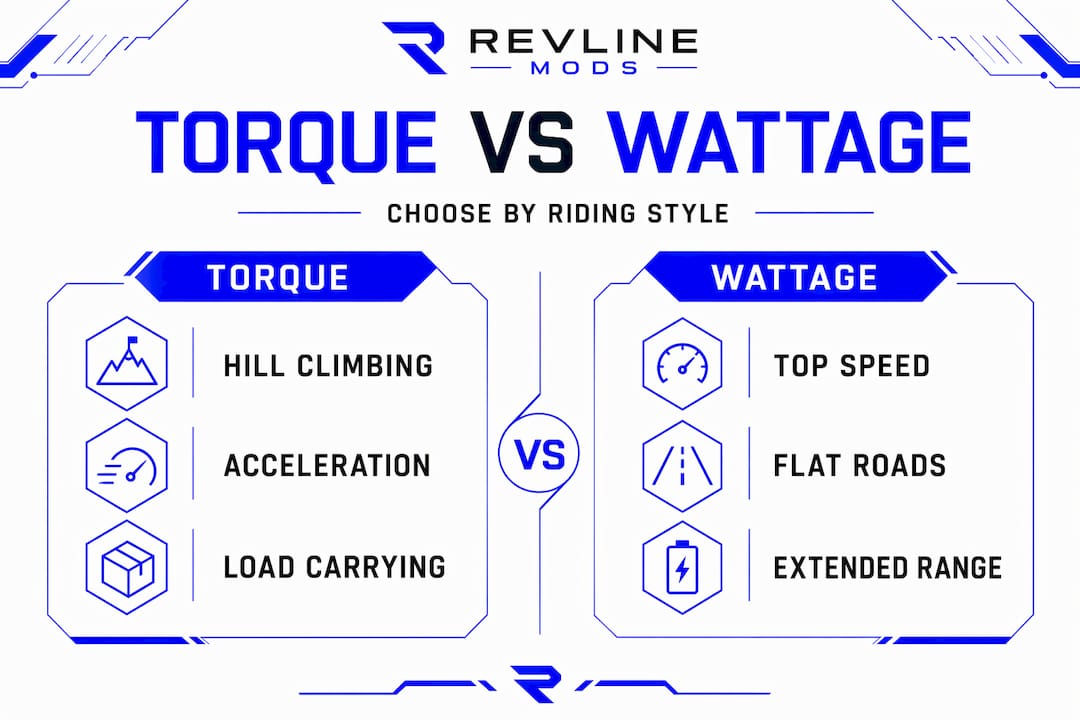
Understanding torque versus wattage is equally critical for any electric bike tuning guide conversation. They are not interchangeable. Torque (Nm) determines hill climbing and cargo acceleration, while wattage (W) governs sustained speed and cruising power on flat roads. A 70 Nm mid-drive motor will out-climb a 750 W hub motor almost every time on steep terrain, even if the hub motor looks more powerful on a spec sheet.
| Metric | What it affects | Best for |
|---|---|---|
| Torque (Nm) | Hill climbing, load carrying, acceleration feel | Off-road, cargo, hilly commutes |
| Wattage (W) | Top speed, sustained cruising output | Flat roads, speed-focused builds |
| Speed class | Legal top assisted speed | Commuting, trail, off-road use |
Top speed specs often mislead buyers. Acceleration, hill feel, and throttle responsiveness define how fast a bike feels in real riding conditions, not a number printed on a box.
Quick wins: maintenance checks that actually move the needle
This is where most riders leave performance on the table. Before any software tuning or hardware swap, a 15 to 30 minute first-pass check can recover speed and efficiency that has been draining away silently.
Work through this checklist in order:
- Tire pressure: Underinflated tires create rolling resistance that kills range and top speed. Check the sidewall for the recommended PSI range and inflate to the higher end for hard surfaces.
- Brake drag: Spin each wheel by hand. If it slows within two or three rotations, your pads are rubbing. A quick caliper adjustment eliminates parasitic drag that the motor has to fight constantly.
- Chain condition: A stretched or dry chain loses power transmission efficiency. Use a chain wear indicator tool. If it reads 0.5% or higher, replace it. Always lube after cleaning.
- Drivetrain alignment: Misaligned derailleurs force the chain to run at an angle, increasing friction and wear. A quick barrel adjuster tweak takes two minutes and you will feel the difference immediately.
- Cockpit tightness: Loose stems and handlebars waste energy through flex and create safety issues at speed. Torque all bolts to spec.
Pro Tip: Clean and lubricate drivetrain components every 150 to 200 miles of riding. Maintaining drivetrain cleanliness and tire pressure significantly impacts battery life and ride enjoyment, not just mechanical longevity.
These checks do not require tools beyond a floor pump, hex key set, and chain checker. The cost is zero. The payoff, especially in range, is immediate and measurable. Riders who skip this step and go straight to buying a bigger battery are paying for a problem a 20-minute wrench session would have solved.
Battery, assist settings, and riding technique for more range
This is the section most guides underdeliver on. Adjusting assist level, pedaling cadence, and tire PSI can unlock 10 to 40% more real-world range without touching the hardware. That is a massive gain for zero dollars.
Here is how to apply it systematically:
- Use dynamic assist levels. Drop from Turbo to Eco or Tour when terrain flattens. Turbo mode roughly doubles energy consumption compared to Eco. Riders who run Turbo constantly on flat ground are wasting battery on power they do not need.
- Target 70 to 90 RPM cadence. Optimal pedaling cadence prevents motor lugging or inefficient low-load operation and dramatically improves battery economy. Spin the gear out before shifting, rather than grinding a big gear at low RPM.
- Account for wind and load. Headwinds at 4 to 5 Bft reduce range by 15 to 30%, and gusts above 6 Bft can cut range nearly in half. Plan routes with wind direction in mind, and reduce cargo weight wherever possible.
- Brake less aggressively. Anticipate stops and coast into intersections. Every hard brake application throws away kinetic energy the motor already spent generating.
- Use manufacturer apps for motor profiling. App-based motor tuning lets you adjust power curves, assist response, and rider profiles within safe, legal parameters. This is the right place to start before considering any firmware modification.
Pro Tip: Ride your normal route once in each assist level and note your Wh/mi reading at the end. You will almost certainly discover that one or two levels down from your default gives you 80% of the feel at 60% of the energy cost.
Performance optimization is a balance between electronic settings and physical riding factors. The riders who get the most from their bikes treat both sides of that equation with equal attention.
Hardware upgrades and advanced tuning: what to know first
At some point, maintenance and technique hit their ceiling. If you have worked through everything above and still want more, hardware upgrades are the next step. But the order matters.
The most common mistake is adding power before upgrading brakes. More speed means longer stopping distances. If your stock pads and rotors were sized for 20 mph assist, running a tuned motor harder without upgrading your stopping system is genuinely dangerous. More on that in the promo section.
For motor decisions, revisit the torque versus wattage framework. A higher-torque motor will transform a bike used for climbing or cargo hauling. A higher-wattage motor makes sense for flat-road speed builds. Read the Revlinemods guide on torque in electric bikes before committing to a motor swap. The spec sheets alone will not tell you which choice fits your terrain.
Battery upgrades are straightforward in theory. A higher-capacity pack (measured in Wh) extends range proportionally, assuming all other variables stay equal. The tradeoff is weight. A heavier battery shifts the bike’s center of gravity and changes handling, especially off-road.
On firmware tuning: modifying firmware to alter speed cutoffs or current limits can void safety certifications and expose you to legal liability. It can also brick a controller that costs hundreds of dollars to replace. Exhaust every software-defined ride customization option through official apps first. The gap between what a manufacturer app enables and what requires firmware hacking has shrunk considerably as brands have responded to rider demand.
Pro Tip: Before any power upgrade, check the Revlinemods hardware modification guide to verify your supporting components, especially brakes and tires, are rated for the performance level you are targeting.
Measuring and verifying performance improvements
You cannot manage what you do not measure. Tracking electric bicycle performance metrics before and after any change is the only way to know if something actually worked.
Follow this verification sequence:
- Establish a baseline Wh/mi figure on your regular route before making any changes. Your bike’s display or a connected app will show this in real time. Measuring your own route’s Wh/mi gives far more useful data than any marketing range claim.
- Run a controlled speed and acceleration test on a flat, traffic-free stretch. Note your top assisted speed, how quickly you reach it, and how the assist feels at different RPM ranges.
- Make one change at a time. Adjust tire pressure, then retest. Adjust assist profile, then retest. Stacking multiple changes at once makes it impossible to know what actually helped.
- Interpret app data after rides. Most mid-drive systems log speed profiles, assist usage, and cadence averages. Review that data weekly and look for patterns: Are you overusing high assist? Is cadence dipping below 65 RPM on climbs?
- Know when to get professional help. If diagnostics point to inconsistent motor output, battery voltage sag under load, or controller errors, a certified e-bike technician is the right next step. Some issues are beyond tuning.
| Metric | What to track | Target range |
|---|---|---|
| Wh/mi consumption | Energy use per mile on regular route | Lower is better; varies by class/terrain |
| Top assisted speed | Max speed with assist active | Near class legal limit |
| Cadence average | Pedaling RPM during assist | 70 to 90 RPM |
| Range achieved | Miles per full charge on real routes | Within 10% of manufacturer claim |
This structured approach to the electric bike maintenance guide mindset transforms tuning from guesswork into a repeatable process.
My honest take on e-bike performance tuning
I have watched a lot of riders go straight to expensive upgrades and come away disappointed because they skipped the fundamentals. In my experience, a well-maintained stock bike with a dialed-in assist profile will outperform a neglected bike with aftermarket parts on almost any real-world route.
The torque versus wattage question trips people up constantly. Riders who mostly climb or carry gear often buy wattage because it sounds bigger, then wonder why their bike feels weak at low speed. Once they understand that torque is the number that gets you uphill, the upgrade decision becomes obvious.
The firmware temptation is real, and I understand it. But what I have seen is that riders who go down that road spend more time troubleshooting than riding, and they often void the very warranty that would have covered a legitimate hardware issue. The official app tools have genuinely improved. Use them first.
What actually creates lasting satisfaction is the habit of small, measured improvements. Pressure the tires, clean the chain, try a different assist level for a week, track the numbers. That loop produces real gains and real knowledge about your specific bike and riding style. That knowledge is what makes the hardware upgrades, when you eventually get there, actually pay off.
— Revline
Upgrade your stopping power before you upgrade your speed

Every performance gain you make through tuning, firmware, or hardware puts more demand on your braking system. If you are serious about pushing your electric bike harder, your brakes need to be the first upgrade on the list. Revlinemods stocks high-performance brake solutions designed specifically for tuned electric bikes and off-road builds. The ULTIMATE Ultra Bee Brake Kit delivers the stopping confidence that upgraded power demands. For a full front and rear setup, the Front and Back Ultra Bee Brakes give you complete control over both ends. Browse the full brake collection at Revlinemods to find the right fit for your build before your next ride.
FAQ
What does an electric bike performance guide actually cover?
A practical electric bike performance guide covers maintenance checks, assist tuning, riding technique, hardware upgrades, and how to measure results. It addresses everything from tire pressure to firmware considerations in a structured order.
How do I improve electric bike performance without buying new parts?
Inflate tires to the recommended PSI, eliminate brake drag, clean and lube the chain, and optimize your assist level and pedaling cadence. These steps alone can recover 10 to 40% of range and noticeably improve speed response.
What is ebike power tuning?
Ebike power tuning refers to adjusting motor assist settings, power curves, and performance profiles through manufacturer apps or, at greater risk, firmware modifications. Most meaningful tuning can be done through official software without touching hardware.
How does cadence affect electric bike range?
Riding at 70 to 90 RPM keeps the motor operating in its efficient zone and prevents the battery drain that comes from grinding low gears at high torque demand. Poor cadence is one of the most common and overlooked causes of reduced range.
When should I upgrade brakes on a performance-tuned e-bike?
Upgrade your brakes before or at the same time as any power increase. Stock brakes are sized for stock speed limits. Adding motor output without upgrading stopping power creates a real safety gap that no tuning trick can compensate for.