


How controllers optimize electric motorcycle performance
Most riders chasing more performance go straight for bigger motors or fatter battery packs. That instinct makes sense on the surface, but it leaves the most powerful variable in the system completely untouched. The controller regulates how battery power is delivered to the motor in real time, translating every throttle input into a commanded torque value while simultaneously protecting your hardware from itself. Ignore it, and you’re tuning with one hand tied behind your back. Understand it, and you unlock a level of ride optimization that no bolt-on motor swap can replicate on its own.
Table of Contents
- What is an electric motorcycle controller?
- Types of control strategies and their impact on ride feel
- Key limits: Current, thermal behavior, and protection logic
- Efficiency, regenerative braking, and overall system tuning
- Why controller tuning—not just upgrades—unlocks real-world performance
- Take your next step: Upgrades and tuning support from Revline Mods
- Frequently asked questions
Key Takeaways
| Point | Details |
|---|---|
| Controller is the ‘brain’ | Your controller manages how battery power is delivered and protects your system from damage. |
| Control mode shapes ride feel | Switching between control strategies like FOC or sine wave can transform your motorcycle’s smoothness and efficiency. |
| Limits preserve performance | Mind thermal and current constraints to avoid cutouts and keep peak performance sustainable. |
| Regen extends range | Smart regenerative braking, managed by your controller, can add valuable mileage between charges. |
| Careful tuning beats raw upgrades | Balanced controller adjustments often deliver better results than just chasing maximum specs. |
What is an electric motorcycle controller?
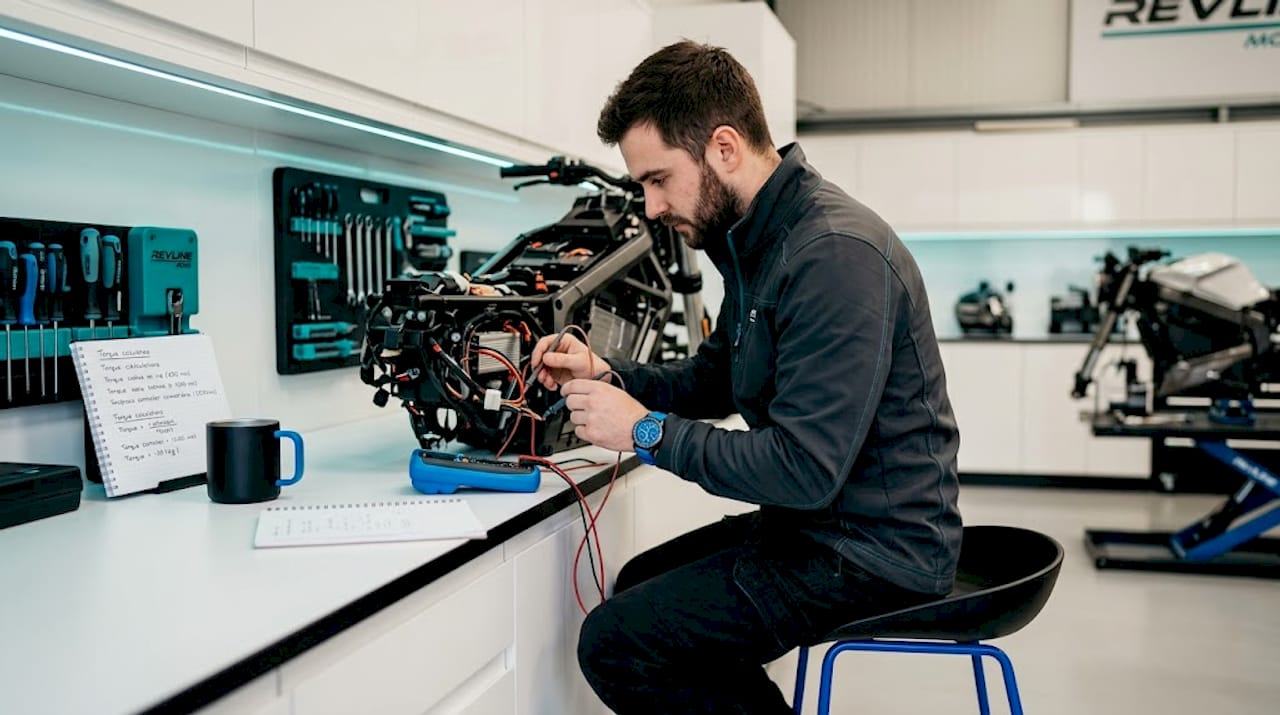
Think of the controller as the central nervous system of your bike. It sits between the battery and the motor, and every watt of power that moves your wheel passes through it first. Nothing happens without its approval.
At its core, the controller reads your throttle position, checks the battery’s state, monitors motor temperature, and then decides exactly how much current to send and at what voltage. It does this thousands of times per second. That constant decision-making is what separates a smooth, responsive ride from one that feels jerky or unpredictable.
Here’s what the controller is actively managing at any given moment:
- Current flow: Determines acceleration rate and torque output
- Voltage regulation: Keeps the motor running within its rated range
- Throttle mapping: Converts analog hand input into precise electrical commands
- Temperature monitoring: Watches motor and controller temps to prevent meltdowns
- Fault detection: Shuts down or reduces power if something goes wrong
“In an electric motorcycle, the controller regulates battery power delivery to the motor in real time—translating rider inputs into commanded current/torque and actively protecting components.”
Understanding what each of those functions actually does is the first step toward tuning effectively. If you’re new to the terminology around these systems, brushing up on controller terminology explained will make every other part of this guide click faster.
Types of control strategies and their impact on ride feel
Now that you know what a controller does, see how the mode it operates in transforms ride dynamics. This is where the technical differences between controllers stop being abstract and start becoming something you can feel through your handlebars.
The control mode shapes ride feel, efficiency, and torque precision across the speed range. There are three main types:
Square wave (trapezoidal) control is the oldest and simplest. It switches motor phases in large, abrupt steps. You get strong low-end punch, but the transitions between steps create audible buzzing and vibration at certain speeds. It’s cheap to implement, which is why it shows up in a lot of stock controllers on budget builds.
Sine wave control smooths those transitions by shaping the current into a continuous wave pattern. The result is quieter operation, less vibration, and noticeably smoother power delivery at mid-range speeds. It costs more to engineer, but for trail riding or commuting, the ride quality difference is immediately obvious.
FOC (Field-Oriented Control), also called vector control, is the top tier. It mathematically decouples the motor’s torque and magnetic flux components, allowing the controller to manage them independently. The result is maximum efficiency, near-silent operation, and precise torque control from zero RPM to redline. FOC controllers demand more processing power and careful tuning, but they reward you with a ride feel that square wave systems simply can’t match.
| Control mode | Noise level | Efficiency | Tuning complexity | Best use case |
|---|---|---|---|---|
| Square wave | High | Low to moderate | Low | Budget builds, raw power |
| Sine wave | Medium | Moderate to high | Medium | Trail riding, commuting |
| FOC/Vector | Very low | High | High | Performance builds, smooth roads |
Pro Tip: Switching from square wave to FOC on an older Surron or Talaria build sounds like a slam-dunk upgrade, but it’s not plug-and-play. Your motor’s pole count, phase resistance, and hall sensor configuration all need to be matched correctly in the FOC firmware. Do your homework on controller modding basics before you commit to the swap.
One underappreciated point: a well-tuned sine wave controller will outperform a poorly configured FOC setup every single time. The mode is only as good as the calibration behind it.
Key limits: Current, thermal behavior, and protection logic
Different control strategies are only effective if they work within your controller’s actual limits. This is where most enthusiastic tuners make costly mistakes, and it’s the part of controller theory that separates confident modders from those replacing fried hardware.
Every controller has two critical current ratings: continuous and peak. Continuous current is what the controller can handle indefinitely without overheating. Peak current is a burst rating that the controller tolerates for a short window, typically a few seconds. Most spec sheets lead with the impressive peak number. Don’t let that fool you.
Thermal limits and current limits are the true edge constraints: push settings too far and you trigger shutdowns or derating, while conservative settings maintain consistent performance. Derating means the controller automatically reduces power output to protect itself. It doesn’t warn you beforehand. One second you have full throttle response, the next you’re wondering why the bike feels sluggish.
Here’s a realistic step-by-step approach for testing new controller settings without damaging your system:
- Start 20% below the manufacturer’s recommended peak current setting. This gives your system room to breathe while you evaluate the baseline feel.
- Ride for 10 minutes at moderate load and check controller and motor temperature using a handheld IR thermometer or an app if your system supports telemetry.
- Increase current limit by 5% increments, repeating the thermal check after each adjustment. Look for temps climbing above 70°C on the controller or 80°C on the motor as your warning flags.
- Test under real load conditions, meaning hills, hard acceleration runs, and sustained high-speed sections, not just flat road cruising.
- Log the data if possible. Many modern controllers support Bluetooth or USB parameter readout. Patterns in temperature spikes tell you more than any single data point.
This table shows what happens at different temperature thresholds on a typical controller:
| Temperature range | Controller behavior | Rider experience |
|---|---|---|
| Below 60°C | Normal operation | Full performance available |
| 60°C to 75°C | Mild derating begins | Subtle power reduction |
| 75°C to 90°C | Significant derating | Noticeable sluggishness |
| Above 90°C | Thermal cutout triggered | Bike loses power completely |
Pro Tip: Mounting your controller in a location with better airflow can gain you 10 to 15 degrees of thermal headroom without touching a single software setting. That translates directly to more sustained performance on long climbs. For more on physical adjustments that support these gains, check out hardware tuning for stability.
The riders who get the most consistent performance aren’t always pushing the hardest settings. They’re the ones who understand where the thermal ceiling sits and stay just below it. That self-awareness is what you develop over time, and it’s what separates the experienced tuners from those chasing max trail gains with no context for what’s sustainable.
Efficiency, regenerative braking, and overall system tuning
Tuning limits is just part of the story. Let’s see how controller optimizations boost efficiency and recover energy on the road.
Raw power is only half the equation. How efficiently your controller converts battery energy into wheel torque determines how far you can ride before you need to charge. This is especially critical on off-road builds where charging infrastructure is non-existent and every mile of range is earned.
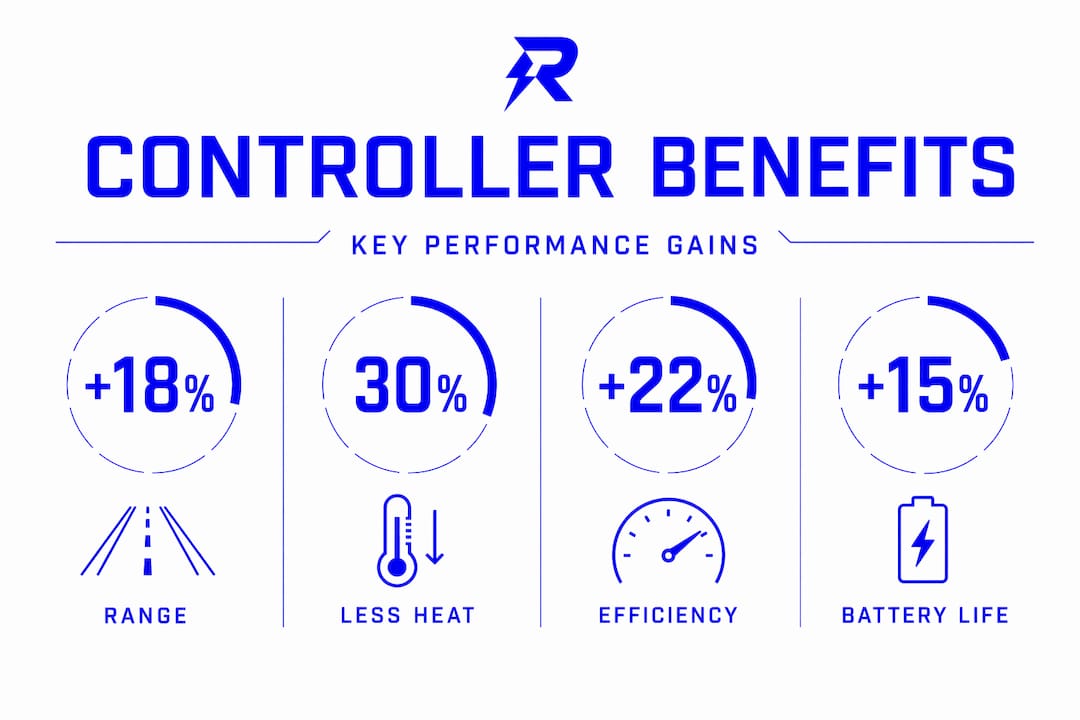
Improved controller efficiency and smoother commutation can increase usable range and reduce waste heat, though real-world impact depends on riding load and thermal conditions. The key word there is waste heat. Every watt that turns into heat in your controller is a watt that didn’t move your wheel. A high-efficiency FOC controller running at 95% efficiency wastes 5% as heat. A poorly tuned square wave controller running at 80% efficiency wastes 20%. On a 60V, 40Ah pack, that difference is meaningful over the course of a ride.
Regenerative braking is one of the most misunderstood controller features in the electric motorcycle space. Here’s what it actually does: when you release the throttle or apply braking force, the controller reverses the motor’s electrical role, turning it into a generator. That captured energy flows back into the battery instead of being lost as heat through friction brakes.
The regenerative braking strategy is a controller-level function: control logic determines how much braking force converts back into electrical energy, which directly impacts efficiency and range. Getting regen right requires balancing aggressiveness with comfort. Too much regen on throttle release creates an abrupt engine-braking effect that can unsettle the rear wheel on loose terrain. Too little and you’re leaving recoverable energy on the table.
Here are the key principles for getting regen tuning right:
- Set regen strength relative to your typical terrain. Hard regen works great on road use with predictable surfaces. Dial it back for trail riding where abrupt deceleration can cause rear-wheel lock.
- Monitor battery state of charge before relying on regen. Regenerative braking is most effective when your battery has room to accept charge. A nearly full battery can’t absorb much, and the controller will limit regen automatically to prevent overcharge.
- Pair regen with proper brake hardware. Regen handles deceleration efficiently at moderate speeds, but physical brakes still take over for hard stops. Upgrading to better regenerative braking components ensures that both systems work together without fighting each other.
Pro Tip: The sweet spot for maximum regen energy recovery is in the mid-speed range, roughly 15 to 35 mph, where the motor generates enough back-EMF to push meaningful current back into the pack. At very low speeds, the recovered energy is minimal. Plan your braking accordingly.
For Surron owners specifically, there are well-documented Surron controller upgrades that address efficiency and regen integration simultaneously, making them worth exploring before you pursue individual component swaps.
Why controller tuning—not just upgrades—unlocks real-world performance
Here’s the uncomfortable truth that we’ve observed working with builders across every platform, from Surron to Talaria to 79Bike. Most people who spend money on controller upgrades are still chasing the wrong metric. They want top speed. Top speed is a number you can brag about. It’s also the least useful measure of whether your build actually performs better.
A controller swap or firmware-based tuning changes both performance and feel, but the real limiter is matching electrical behavior to motor characteristics and protecting against overheating, not raising the speed ceiling.
What that looks like in practice: a rider who bumps peak current to squeeze out 3 extra mph might also be pushing their controller into thermal derating territory during any sustained climb. So they get a faster bike on flat ground and a slower, more frustrating bike everywhere that actually matters. Meanwhile, someone who stays within thermal limits but optimizes their throttle curve and regen settings gets a bike that feels faster because power delivery is consistent and predictable, even if the top speed number is technically lower.
Aggressive current ramp tuning that exceeds thermal headroom can feel great briefly but reduces real-world average performance when the controller and motor enter limiting states during sustained high load. We’ve seen this pattern enough times that it’s essentially a rule of thumb in our shop.
The riders who get the most out of their builds are the ones who treat the controller as a system-balancing tool rather than a power-multiplier. They ask questions like: does my throttle curve match my riding style? Is my regen setting appropriate for the terrain I’m on? Is my controller mounting position creating a thermal bottleneck? Those questions lead to real performance improvements that hold up across an entire ride, not just in the first burst off the line.
The essential controller tuning guide we’ve published goes deeper on the practical steps, but the mindset shift is the real unlock. Stop treating the controller as a limiter to bypass. Start treating it as the most intelligent tool in your build.
Take your next step: Upgrades and tuning support from Revline Mods
Ready to apply what you’ve learned or explore more advanced mods? Here’s how Revline Mods can help.
Understanding controller theory is step one. Backing it up with hardware that can handle what you’re asking of the system is step two. If you’re pushing higher current limits, your braking system needs to keep pace. A controller optimized for aggressive acceleration is only as good as the stopping power behind it.

Our performance brake upgrades are built specifically for the demands of modified electric motorcycles, where stock hardware regularly gets outmatched by upgraded power outputs. For riders on Ultra Bee platforms looking for a complete stopping solution that supports higher-performance controller settings, the ULTIMATE Ultra Bee Brake Kit is our most popular complete upgrade. It pairs seamlessly with regen-equipped builds and gives you the physical stopping confidence to match your electrical tuning. Browse the full catalog and find the components that complete your build.
Frequently asked questions
How does the controller protect my electric motorcycle?
The controller continuously monitors current draw, motor temperature, and voltage levels, and actively protects components by triggering overcurrent cutoffs and thermal shutdowns before damage occurs.
Can changing controller settings improve my range?
Yes. Optimizing efficiency settings and regenerative braking strategy directly impacts how much energy your system recovers and wastes, with real-world range gains depending on your riding load and terrain.
What happens if I push my controller settings too hard?
Exceeding your controller’s thermal or current capacity triggers thermal shutdowns or derating, which cuts power automatically and risks accelerating hardware degradation over time.
Is upgrading my controller worth it for better acceleration?
A controller upgrade can deliver real gains, but only if the new unit’s control mode and thermal capacity match your motor and battery setup. Mismatched upgrades often underperform compared to a well-tuned stock unit.