


Waterproofing electric bikes: protect your ride for any weather
You probably assume your electric bike can handle a little rain. Most riders do. The truth is that most e-bikes are water-resistant, not waterproof, and the difference matters a lot more than the spec sheet suggests. Water damage rarely comes from riding through a downpour. It sneaks in at connectors, seams, and charge ports, building up over time until something shorts out or stops working entirely. This article breaks down what waterproofing really means for e-bikes, how to read your bike’s actual risk level, and what you can do right now to protect your investment.
Table of Contents
- What waterproofing an electric bike really means
- Understanding IP ratings and system limits
- Vulnerable areas: where water causes real trouble
- DIY waterproofing: tools, methods, and best practices
- Long-term performance: care, storage, and riding strategies
- What most e-bike owners get wrong about waterproofing
- Upgrade your electric bike for better weather protection
- Frequently asked questions
Key Takeaways
| Point | Details |
|---|---|
| True waterproofing is rare | Electric bikes are generally water-resistant, not fully waterproof, so be careful with exposure. |
| Weakest link matters | Your bike’s safety in wet conditions depends on its lowest-rated component’s protection level. |
| Critical trouble spots | Battery seams, connectors, and charge ports are the most vulnerable to water problems. |
| DIY strategies help | Using dielectric grease and covering exposed areas can reduce water risk if done properly. |
| Smart habits extend life | Proper riding, after-care, and thoughtful upgrades keep e-bikes reliable in any weather. |
What waterproofing an electric bike really means
With that misconception cleared up, let’s clarify what e-bike waterproofing actually involves. The core idea is simple: waterproofing means protecting electronics from water getting inside where it can cause shorts, corrosion, or permanent failure. But the word “waterproof” gets thrown around in ways that cause real confusion.
Water-resistant means the bike can handle light rain, splashes, and wet roads without immediate damage. Waterproof would mean it could survive full submersion, which almost no consumer e-bike is designed for. When a manufacturer says their bike is “water-resistant,” they mean it can survive a typical commute in drizzly weather, not a river crossing.
The components that need the most protection are:
- Battery pack: The most expensive part on the bike, and also the most sensitive to moisture
- Motor: Usually well-sealed, but seams can degrade over time
- Controller: Packed with electronics and often located in an exposed position
- Display and wiring harness: Exposed to direct weather at all times
- Connectors and charge port: The most common entry point for water in real-world use
“Electrical failures from water usually don’t happen all at once. They build up at the smallest, least-noticed weak points until the bike refuses to run or throws constant errors.”
Severe failure from a single rainstorm is rare. What’s more common is gradual corrosion at connectors, intermittent shutdowns caused by moisture in the controller, or a battery that starts losing capacity because of moisture inside the case. These are slow problems that show up weeks after a wet ride.
Understanding IP ratings and system limits
Now that we know which parts are at risk, let’s look at how water resistance is actually measured. The standard used across the e-bike industry is the Ingress Protection (IP) rating system. IP ratings use two numbers: the first covers dust resistance, the second covers water resistance. A rating of IP65, for example, means the component is fully dust-tight and can handle water jets from any direction.
Here’s how the water resistance scale breaks down for the numbers you’ll commonly see on e-bike components:
| IP rating | Water protection level | Common e-bike use |
|---|---|---|
| IPX4 | Splash-proof from all directions | Budget displays, some controllers |
| IPX5 | Protected against low-pressure water jets | Mid-range batteries, connectors |
| IPX6 | Protected against high-pressure water jets | Performance motors, premium batteries |
| IPX7 | Submersion up to 1 meter for 30 minutes | High-end batteries, specialty builds |
| IPX8 | Continuous submersion beyond 1 meter | Rarely seen in standard e-bikes |
The critical point that most riders miss: e-bike waterproofness is rated per component, meaning your bike might have a motor rated at IP67 and a controller rated at IPX4. In that case, your real-world protection level is IPX4. The system is only as resilient as its lowest-rated part. An IP rating is meaningful only for the specific part tested, so a glowing spec for one component tells you nothing about the bike as a whole.
Pro Tip: Before your next wet ride, look up the IP ratings for each major component on your specific bike model. If you can’t find a rating for the controller or connectors, assume they’re the weak link.
For riders who want to go deeper on how manufacturers use this terminology, take a look at our guide to understanding e-bike IP ratings. If you already want to act on what you learn, our DIY waterproofing mods guide covers the hands-on side.
Vulnerable areas: where water causes real trouble
Once you know your risk thresholds, it’s easier to find your bike’s most vulnerable spots. Not all weak points are equal. Some fail quickly and obviously. Others corrode slowly over months before anything visibly goes wrong.
Moisture-related failures after wet riding most often localize to connectors or battery terminals, not the entire bike electronics. That’s actually useful information. It means targeted protection at these spots gives you the biggest return on effort.
Here’s a breakdown of the most common failure points and why they’re at risk:
| Vulnerable area | Primary risk | Why it fails |
|---|---|---|
| Battery seam and casing | Corrosion, capacity loss | Seals degrade, water wicks into cells |
| Connector housing | Short circuits, dropout | No IP rating, water pools and sits |
| Charge port | Corrosion, failed charging | Left uncovered, water enters directly |
| Display and mounts | Fogging, screen failure | Seals crack from UV exposure over time |
| Controller enclosure | Complete bike shutdown | Often mounted low, catches road spray |
The worst-case scenario for connectors isn’t an immediate failure. It’s oxidation building up over several months, increasing resistance, and gradually degrading performance until the bike starts cutting out under load. Riders often blame the battery or motor before checking the connectors first.
Battery seam corrosion is particularly sneaky. The seam where the top and bottom of the battery case meet is a common entry point, especially on bikes that aren’t stored indoors after wet rides. Water doesn’t have to flood in. Just persistent condensation is enough to start the process.
For practical guidance on how component condition affects ride quality, check out our resource on hardware care for e-bikes. If you’re riding trails where mud and water exposure is more intense, the off-road waterproofing tips we’ve put together are worth a read too.
Key areas to check after every wet ride:
- Connector housings: Look for discoloration or white residue indicating mineral deposits
- Battery seam: Run your finger along the joint to feel for soft sealant or gaps
- Charge port cover: Confirm it seats fully and hasn’t cracked or stiffened
- Controller vents (if present): Dry with compressed air before the next ride
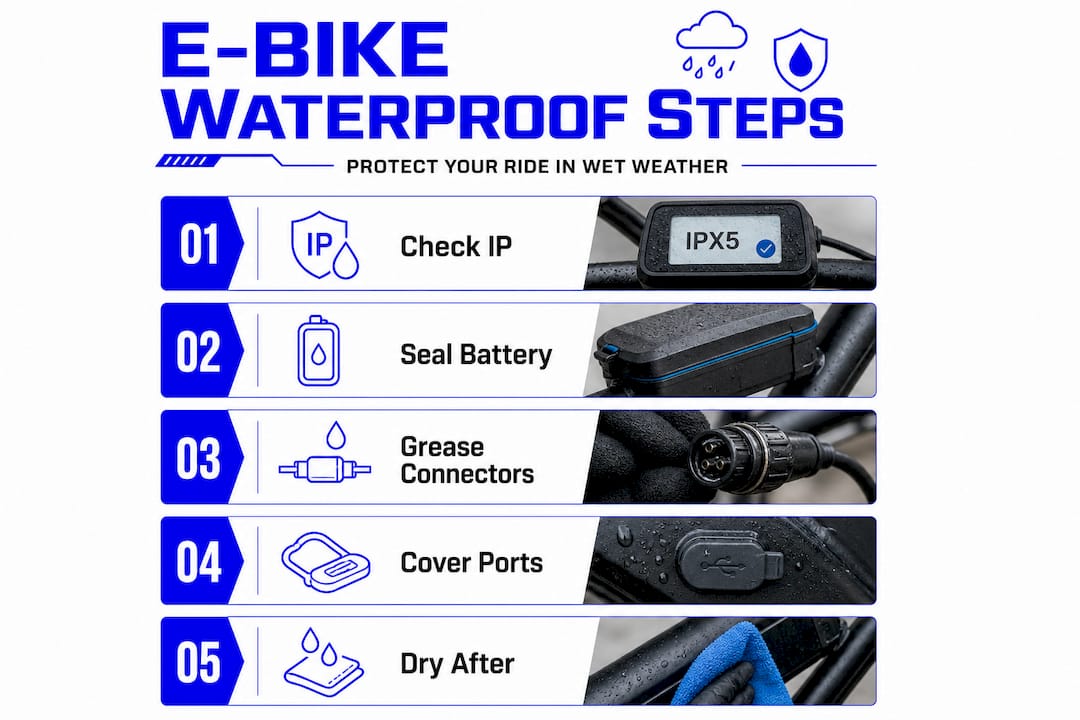
DIY waterproofing: tools, methods, and best practices
Fixing vulnerable areas doesn’t have to mean a trip to the shop. Here’s what you can do yourself. The good news is that most effective waterproofing upgrades cost under $20 and take less than an hour. The bad news is that doing it wrong can actually make things worse, especially if you trap moisture inside or block the ability to service parts later.
Owners can add extra waterproofing using dielectric grease, new gaskets, flexible silicone, and careful sealing, but improper application can hurt serviceability and even void warranties. Keep that in mind as you work through these steps.
- Apply dielectric grease to every connector. Dielectric grease is a non-conductive silicone-based lubricant that displaces water and prevents corrosion. Disconnect each plug, apply a small amount to the inside of the female connector, and reconnect. Don’t overfill. A pea-sized amount is enough.
- Seal cable entry points with self-amalgamating tape. Anywhere a cable enters the frame or a housing is a potential water entry point. Self-amalgamating tape fuses to itself without glue and creates a flexible, waterproof wrap.
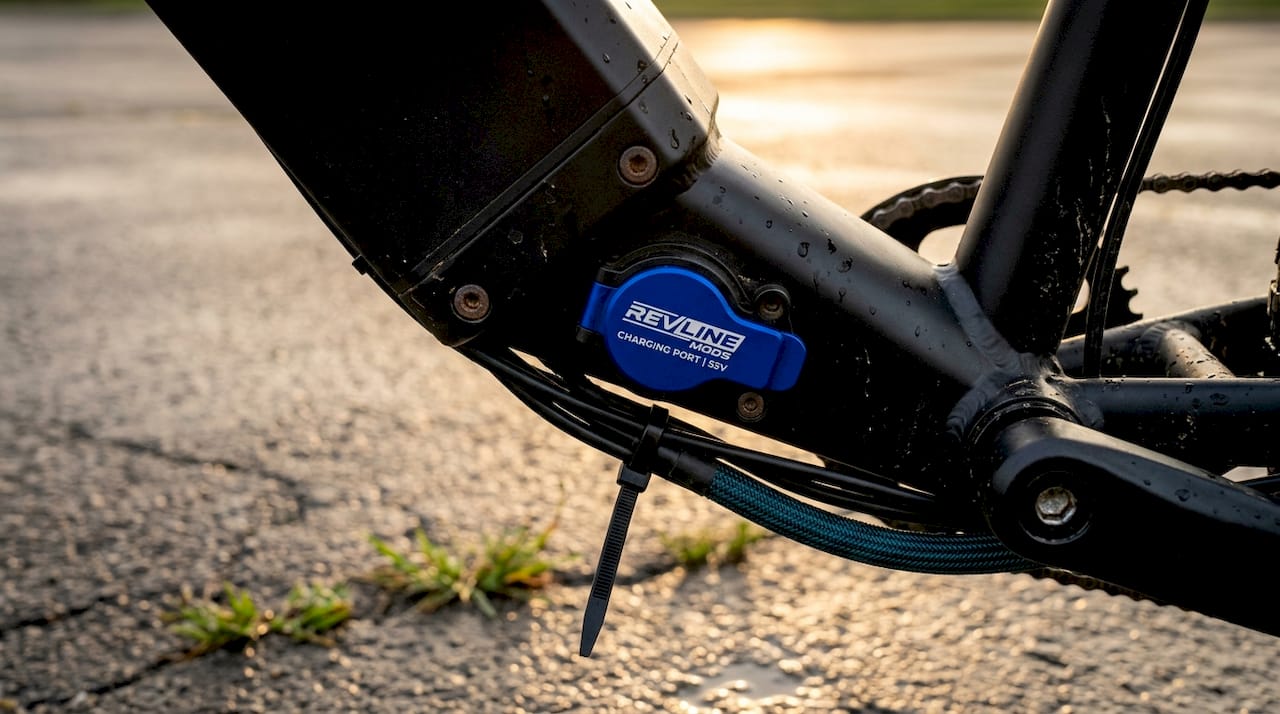
- Add a charge port protector or cover. If your bike came with a rubber plug for the charge port, replace it immediately if it’s cracked or stiff. If it didn’t come with one, aftermarket covers are cheap and widely available.
- Inspect and reseal battery case joints. Use a thin bead of flexible silicone sealant along the seam. Avoid rigid sealants that crack under vibration. Let it cure fully before riding in wet conditions.
- Apply a conformal coating to the controller board (advanced). This involves opening the controller housing and spraying the circuit board with a moisture-resistant coating. This is effective but means you need to be comfortable with electronics. Only do this if your warranty is already expired.
Pro Tip: Never use silicone sealant generously around parts you’ll need to access later, like the battery removal latch or controller mounting bolts. Use tape or removable solutions in those areas instead.
Long-term performance: care, storage, and riding strategies
DIY upgrades go even further with smart everyday habits and storage routines. A well-sealed bike that gets stored badly or never dried out will still fail prematurely. Waterproofing is a system, not a one-time fix.
Durability and long-term reliability depend on both the quality of component ratings and consistently reducing water exposure through fenders, storage habits, and after-ride drying routines. The rider’s behavior matters just as much as the hardware.
Smart habits that extend your e-bike’s weather resilience:
- Install front and rear fenders if you don’t have them. Fenders dramatically reduce the amount of water and mud thrown directly at your battery, controller, and connectors from the tires
- Store indoors or under waterproof cover after wet rides. Temperature changes cause condensation. A cold, wet bike stored in a warm shed overnight will sweat moisture into every gap
- Never use a pressure washer. High-pressure water defeats even well-rated seals and pushes water into crevices that normal rain never reaches
- Let the bike dry before your next ride. Leave connectors open to air for at least 30 minutes if you rode through heavy spray or puddles
- Check seals seasonally. UV radiation, vibration, and temperature cycles break down rubber and silicone over time. What sealed perfectly in spring may be cracked by fall
For more weatherproof riding setups, our weatherproof riding upgrades guide goes further into component choices for riders who deal with all-season conditions regularly.
Pro Tip: After any ride that included puddles or heavy rain, use a dry cloth to wipe down all visible connector points before storage. It takes 90 seconds and prevents the majority of corrosion-related issues.
What most e-bike owners get wrong about waterproofing
Here’s a take you won’t find in most buying guides: waterproofing your e-bike isn’t a project. It’s a mindset.
Most riders treat waterproofing as a one-time fix. They apply dielectric grease once, slap some silicone on the battery seam, and assume the problem is solved. Then they’re baffled when the bike starts cutting out six months later. The issue isn’t that their DIY work failed. It’s that they treated a dynamic, ongoing risk as a static, solved problem.
Adding sealant or grease can help, but it doesn’t replace quality factory sealing. Overall reliability depends on the weakest sealed interface in the entire system. If your bike came from the factory with a poorly sealed controller housing or thin rubber plugs over the charge port, no amount of aftermarket silicone fully compensates for that. The factory seal is the foundation. DIY fills the gaps.
The second thing most riders get wrong is confusing protection level with permission to ride recklessly in wet conditions. A bike with IP67-rated components can still fail if you ride through a flooded trail at speed, park it in standing water, or leave it uncovered in weeks of wet weather. High IP ratings reduce risk. They don’t eliminate it.
The realistic goal is risk management, not waterproofing perfection. Ride with awareness of your bike’s actual weak points. Maintain your seals. Dry things out after wet rides. Those habits are worth more than any single aftermarket upgrade. For riders building a higher-performance, better-protected machine from the ground up, exploring premium e-bike upgrades designed for durability is a smarter long-term strategy than patching a bike that wasn’t built to handle serious conditions.
Upgrade your electric bike for better weather protection
Your bike’s long-term weather resilience comes down to the quality of its components as much as your maintenance habits.
At Revline Mods, we carry parts specifically designed for durability and protection in demanding conditions. Protecting your drivetrain from mud and debris starts with solid coverage. The Talaria rear shock guard keeps your rear suspension protected from trail debris and water spray. For front-end protection, the Surron front fender provides solid coverage against road and trail splash. If you’re also looking to improve stopping performance in wet conditions where grip matters most, browsing our range of high-performance brakes is a great next step. Real weather protection is built from the right parts up.
Frequently asked questions
Can I ride my electric bike in heavy rain?
Most e-bikes are safe for light to moderate rain but not for heavy downpours or deep puddles. Since most e-bikes are water-resistant rather than truly waterproof, your real risk level depends on the lowest-rated component in your specific bike’s system.
What does an IP rating mean for my e-bike components?
IP ratings show how resistant each individual part is to dust and water penetration. Because IP ratings are per component, the weakest-rated part in your system sets your actual safe riding limits, regardless of how well other components are protected.
What are the most important areas to waterproof on my e-bike?
Focus on the battery compartment seam, connector housings, and the charge port first. Guides recommend sealing these areas because they represent the highest-probability failure points in real-world wet riding conditions.
Should I use pressure washers to clean my e-bike after muddy rides?
Never use a pressure washer on your e-bike. Pressure washing can bypass seals and force water into electronics that would otherwise survive normal rain exposure without any issue.
Does adding more sealant or grease guarantee full waterproofing?
Extra sealant and dielectric grease definitely help, but overall reliability still depends on the weakest factory-sealed part in your system. As sealant helps but doesn’t replace manufacturer sealing quality, DIY measures work best as a supplement to a well-built bike, not a substitute for poor factory design.