


What Is Plug and Play in Ebikes: Rider's Guide
If you’ve been shopping for e-bike upgrades, you’ve probably seen “plug and play” stamped on everything from throttle kits to full conversion systems. The assumption is obvious: buy the part, plug it in, ride. But what is plug and play in ebikes really means is a bit more nuanced than that marketing promise suggests. It refers to standardized electrical connectors and modular components designed to simplify installation, but it doesn’t mean zero effort or guaranteed compatibility. This guide breaks down exactly how plug and play technology works, what it can and can’t do, and how to use it to build a better bike.
Table of Contents
- Key Takeaways
- What plug and play means in e-bike technology
- Installation and compatibility: what to expect
- Advantages and limitations of plug and play systems
- Choosing and upgrading your e-bike with plug and play
- My take on plug and play: the honest version
- Upgrade your ride with Revlinemods
- FAQ
Key Takeaways
| Point | Details |
|---|---|
| Plug and play simplifies, not eliminates | Standardized connectors reduce installation complexity but still require mechanical fit verification. |
| Installation times vary widely | Hub motor kits take 20 to 45 minutes; mid-drive conversions can run 2 to 4 hours. |
| Compatibility isn’t automatic | Wheel size, dropout spacing, and firmware must align before any connector clicks together. |
| Modular systems future-proof your ride | Swappable batteries and components let you adapt one bike for commuting, cargo, or off-road use. |
| Firmware can block true plug and play | Proprietary protocols may prevent third-party components from working even when connectors physically match. |
What plug and play means in e-bike technology
At its core, plug and play in e-bikes refers to components engineered with standardized electrical connectors and mounting systems so that installation requires minimal tools and technical knowledge. Think of it as the USB standard applied to bike hardware. When manufacturers agree on a connector shape, pin layout, and voltage spec, parts from different product lines can connect without custom wiring.
The term covers several distinct types of components:
- Throttles and displays: Pre-wired, keyed throttles can be installed in about 5 minutes because the connector physically only fits one way, cutting out the guesswork.
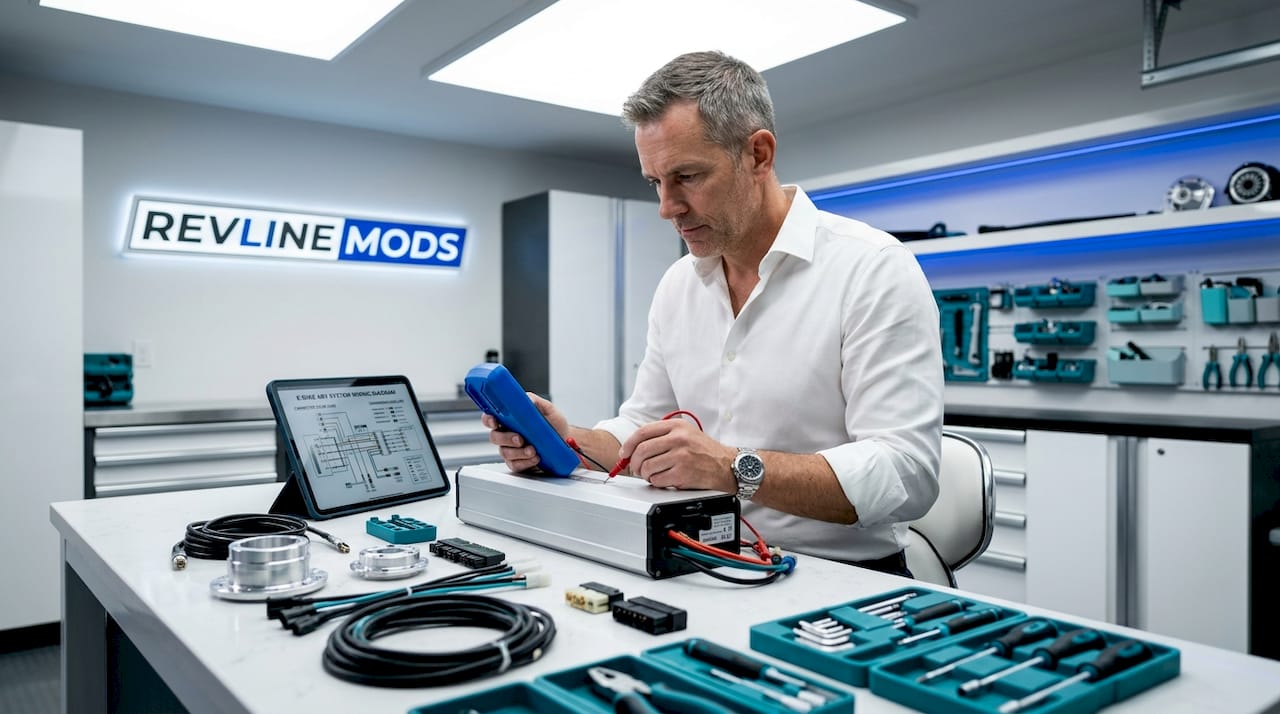
- Hub motor conversion kits: These include a motorized wheel, controller, and wiring harness with matched connectors. Tool-free or minimal-tool installation typically takes 20 to 45 minutes for a hub motor setup.
- Modular battery packs: Some systems use patented quick-release mounts that let you swap batteries in under 10 seconds, with dual-pack setups adding 50 to 100 miles of range.
- Controllers: Matching a controller to a motor still requires checking voltage ratings and connector types, but plug and play controllers come pre-mapped for the most common configurations.
One thing worth clarifying upfront: electrical plug-and-play connectors are keyed and color-coded, which is fundamentally different from the mechanical quick-release systems used for wheels or seatposts. Both get called “quick release,” and the crossover in terminology confuses a lot of riders. The electrical side is about wiring circuits cleanly. The mechanical side is about physical clamping force. You need both working correctly, and they operate independently.
Pro Tip: When evaluating a plug and play kit, always check whether the connectors are JST, XT60, or a proprietary format. Proprietary connectors may limit your upgrade options down the road.
Installation and compatibility: what to expect
The phrase “bolt on and go” moves units. Reality takes a little longer. That said, plug and play ebike modular systems genuinely do reduce setup time compared to building from loose components. Knowing what affects that timeline keeps you from being caught off guard.
Here is a realistic step-by-step overview of a hub motor conversion installation:
- Verify physical compatibility first. Check your wheel size (26-inch, 27.5-inch, 700c, etc.), rear dropout spacing (typically 135mm or 142mm), and frame material before ordering anything. Compatibility verification before purchase is the step most riders skip, and it causes the most returns.
- Remove the existing wheel and inspect the dropout. Look for damage, misalignment, or non-standard spacing. A bent dropout causes torque arm problems that no connector can fix.
- Mount the motor wheel and torque arm. The torque arm anchors the motor against the frame so it doesn’t spin in the dropout under load. Skipping this step is a safety hazard.
- Route the cables carefully. This step takes longer than people expect. Experienced installers spend extra time on cable management to prevent snagging, pinching, and connector strain. Rushing cable routing is the most common cause of early failures.
- Connect the wiring harness. Match colors, match key orientations. Plug in the throttle, brake sensors, and display.
- Power on and test before riding. Check throttle response at standstill, confirm brake cutoffs work, and verify the display reads correctly.
Mid-drive systems follow a similar sequence but add bottom bracket removal, chainring alignment, and sensor calibration. That extra complexity is why mid-drive installs typically run 2 to 4 hours even with a plug and play kit.
Pro Tip: Always power down the battery completely before connecting or disconnecting any electrical component. Connecting a controller under live voltage can fry the motor driver instantly.
Compatibility does not stop at physical fit. Battery voltage and controller amp ratings must match. A 48V battery paired with a 36V controller will damage the system. And if you mix brands, check whether the display protocol is supported. Some manufacturers use proprietary communication standards that make third-party displays read incorrectly or not at all.
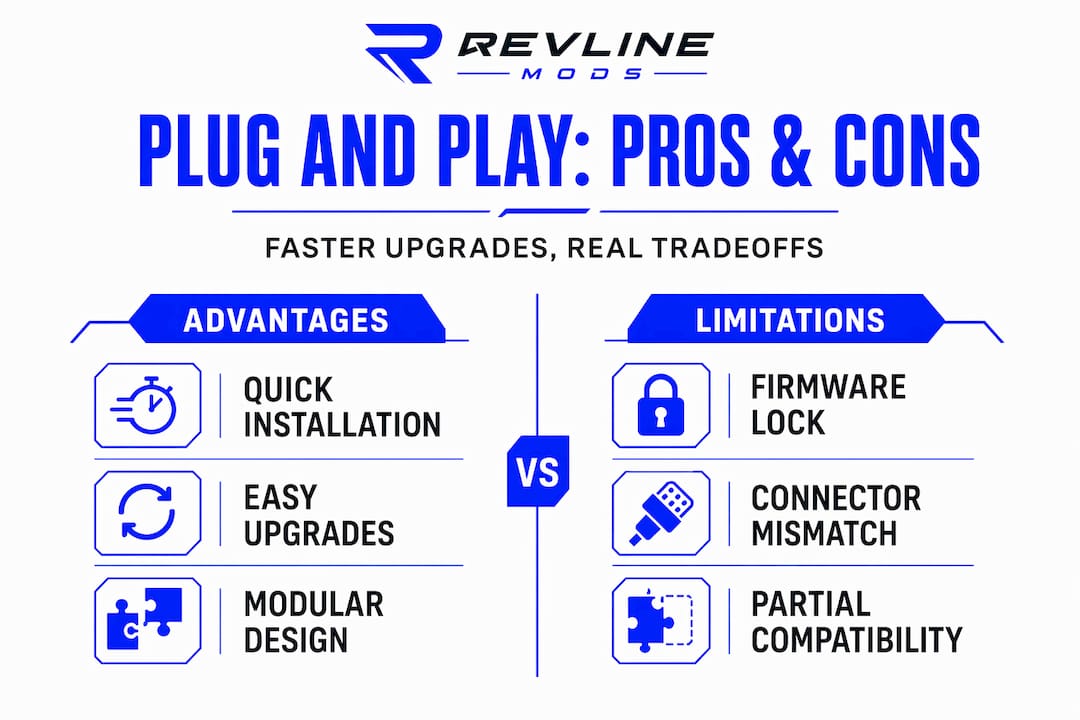
Advantages and limitations of plug and play systems
Understanding both sides of plug and play helps you buy smarter and set expectations that match reality.
| Factor | Advantage | Limitation |
|---|---|---|
| Installation speed | Hub motor kits install in 20 to 45 minutes with basic tools | Mid-drive and full conversions still take 2 to 4 hours |
| Battery flexibility | Modular packs swap in seconds; dual setups extend range significantly | Quick-release mounts are often brand-specific |
| Future-proofing | Modular systems adapt bikes for cargo, commuting, or off-road without buying new | Component availability depends on manufacturer staying in business |
| Third-party compatibility | Standardized connectors (JST, XT60) work across many brands | Proprietary firmware can block integration even when connectors match physically |
| Maintenance | Plug and play reduces wiring complexity for routine checks | Mechanical parts still require regular safety checks for vibration loosening |
The biggest misconception in the modular ebike components space is that plug and play eliminates maintenance entirely. It does not. Quick-release levers, torque arms, and cable connections all work loose under vibration over time. A bolt-on throttle that felt solid during installation can develop play after 200 miles of trail riding.
The benefits of plug and play ebikes are real, though. For the DIY crowd, modular systems mean you can upgrade one component at a time instead of swapping an entire drivetrain. For newcomers, pre-mapped controllers and color-coded harnesses make a conversion project far less intimidating. And for riders who use one bike frame across multiple setups, swappable batteries and quick-connect motors genuinely extend the useful life of a bike that might otherwise be replaced.
The limitation worth taking seriously is firmware lock. Some manufacturers use proprietary protocols that prevent third-party plug and play components from communicating correctly with the main system. You might buy a throttle with the right connector shape and still find it behaves erratically because the firmware doesn’t recognize it. Research the communication standard your system uses before shopping for add-ons.
Choosing and upgrading your e-bike with plug and play
When you’re ready to apply plug and play technology to your own build, a structured approach saves time and money. Here’s what to prioritize:
- Start with your frame specs. Before looking at any kit, write down your wheel diameter, dropout width, bottom bracket type, and frame material. This one step eliminates 80% of the compatibility problems riders run into.
- Match voltage across all components. Battery, controller, and motor must share the same voltage rating. Mixing 36V and 48V components is the most common and most expensive mistake in DIY e-bike builds.
- Check the communication protocol. Ask the seller whether the display and controller use a standard protocol like UART or CAN bus, or a proprietary system. Standard protocols give you more upgrade flexibility later.
- Evaluate kit documentation quality. A good plug and play kit comes with a wiring diagram, torque specs, and a support contact. If the listing has no documentation, treat that as a red flag regardless of connector type.
- Plan your cable routing before you mount anything. Lay the harness along your frame dry, before connecting it, to identify where it might rub against moving parts or get pinched by the head tube.
For ongoing maintenance, build a 30-day check into your calendar after any new installation. Inspect torque arm bolts, test brake cutoffs, and look for any insulation wear at sharp frame edges. Check out this e-bike maintenance guide for a full checklist that covers both electrical and mechanical systems.
If you want to go deeper on the modification side, this guide to modifying electric bike hardware covers installation methods and safety procedures for electrical component upgrades that go beyond the basics.
The cost math is also worth understanding. A DIY plug and play conversion typically runs $250 to $1,400 in parts, compared to $1,500 to $5,000 or more for a new purpose-built e-bike. For riders who already own a quality frame, that gap is hard to ignore.
My take on plug and play: the honest version
I’ve seen a lot of riders walk into a plug and play upgrade expecting the experience to mirror charging a phone. They get frustrated when reality involves a torque wrench and thirty minutes of cable routing. That frustration is understandable, but it’s also avoidable.
In my experience, the real value of plug and play technology isn’t that it makes installation effortless. It’s that it makes installation possible for people who aren’t mechanics. The standardized connectors, color-coded harnesses, and pre-mapped controllers take a task that used to require an electrician and reduce it to something a motivated rider can handle in an afternoon.
What I’ve learned from watching builds go wrong is that compatibility research is where the work actually lives. The connector clicks in one second. Figuring out whether your frame has the right dropout spacing takes thirty minutes of research. Those thirty minutes are the most important part of the process.
I also think the firmware issue is underappreciated. Riders spend a lot of time matching connectors and almost no time checking communication protocols. That mismatch between physical fit and functional compatibility is where the most frustrating surprises happen. If you’re mixing brands, verify firmware compatibility first, not after you’ve already ordered.
The modular systems that excite me most are the ones designed for genuine flexibility, where swapping a battery or changing a wheel size doesn’t require buying into a new ecosystem. That’s where electric motorcycle trends in 2026 are pushing the industry, and it’s a direction worth paying attention to.
— Revline
Upgrade your ride with Revlinemods
If you’re ready to put plug and play technology to work on your build, Revlinemods carries parts designed for exactly this kind of upgrade.
The upgraded Surron throttle is a direct plug and play replacement engineered for clean installation and sharper throttle response, with no splicing or custom wiring required. It’s the kind of part that actually delivers on the plug and play promise because it was built specifically for the platform it fits. Beyond throttles, Revlinemods stocks a full range of aftermarket components for Surron, Talaria, and 79Bike platforms, from protective accessories like the Talaria rear shock guard to wheelset upgrades designed to drop into compatible frames without modification. Every product listing includes compatibility notes, and the support team can verify fit before you order.
FAQ
What does plug and play mean for an e-bike?
Plug and play in e-bikes refers to components with standardized connectors and mounting systems that allow installation without custom wiring or specialized tools. It simplifies upgrades but still requires verifying mechanical and electrical compatibility before purchase.
How long does a plug and play e-bike conversion take?
Hub motor kits typically install in 20 to 45 minutes, while mid-drive systems require 2 to 4 hours due to additional steps like bottom bracket removal and sensor calibration. Cable management adds time to both.
Will any plug and play component work with my e-bike?
Not automatically. Physical connectors must match, but voltage ratings, wheel sizing, dropout spacing, and firmware protocols all affect whether a component will function correctly. Always check manufacturer specs before ordering.
Can firmware affect plug and play compatibility?
Yes. Proprietary firmware and communication protocols can prevent third-party plug and play components from working even when the connector fits physically. Verify the communication standard your system uses before mixing brands.
Do plug and play e-bike parts need maintenance?
Absolutely. Plug and play reduces installation complexity, but mechanical components like torque arms, cable connections, and quick-release levers still loosen under vibration and require regular inspection, especially in the first month after installation.